Ever noticed your skin feeling dry or your hair looking dull after a shower? The culprit might be the water itself. Many homes have hard water filled with chlorine and other impurities that can wreak havoc on your skin and hair. But don’t worry, there’s a simple solution—shower filters.
Shower filters can transform your daily routine by removing harmful contaminants, leaving you with softer skin and shinier hair. They’re easy to install and can make a world of difference. Let’s dive into the best shower filters that can turn your everyday shower into a spa-like experience.
Understanding Shower Filters
Shower filters enhance water quality, which benefits your skin and hair. These filters remove contaminants, improving your shower experience.

Why Use a Shower Filter?
Using a shower filter prevents exposure to harmful chemicals. It reduces chlorine, which can dry out your skin and hair. Filters also remove sediments, improving water quality and overall hygiene. By using a shower filter, you create a safer environment for your family.
How Shower Filters Work
Shower filters use various stages to purify water. Initial stages remove large particles like sand and rust. Subsequent stages use activated carbon to absorb chlorine and organic compounds. Some filters include KDF (Kinetic Degradation Fluxion) to target heavy metals. By passing water through these stages, a shower filter delivers cleaner, safer water.
Top Features to Consider in a Shower Filter
When choosing a shower filter, focus on the features that enhance performance and longevity.
Filtration Technology
Look for multi-stage filtration. These systems use layers to remove chlorine, sediments, and heavy metals. KDF (Kinetic Degradation Fluxion) filters perform well in removing chlorine and bacteria. Activated carbon filters excel in absorbing impurities and organic materials. Some filters combine vitamin C to neutralize chlorine further. Check for certifications to ensure effectiveness.
Durability and Maintenance
Choose filters with high-quality materials. Stainless steel casings resist corrosion. Plastic components should be BPA-free. Opt for filters with a long lifespan, typically 6-12 months. Replaceable cartridges simplify maintenance. Consider transparent casing to easily monitor filter status. Evaluate warranty and customer reviews for additional assurance.
Review of the Best Shower Filters
Finding the right shower filter improves your water quality and enhances your shower experience. Here are top picks categorized.


Best Overall Shower Filter
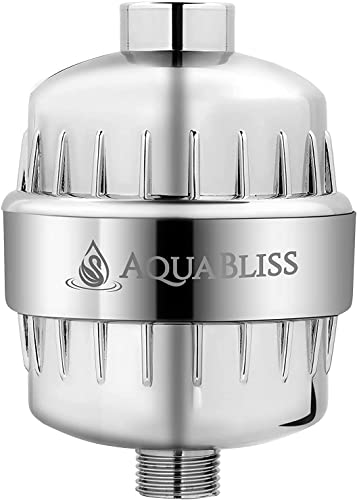
AquaBliss High Output 12-Stage
AquaBliss High Output 12-Stage provides thorough filtration. It combines KDF 55, calcium sulfate, and activated carbon. You instantly notice softer hair and skin. Installation takes minutes. It’s compatible with most showerheads. Users praise its durability.
Best Budget-Friendly Shower Filter
Culligan WSH-C125
Culligan WSH-C125 delivers solid performance at a great price. It reduces chlorine and scale buildup. A replaceable filter cartridge ensures long-lasting use. The anti-clog nozzle provides a consistent water flow. Easy installation suits any budget-conscious buyer.
Best Shower Filter for Hard Water
AquaHomeGroup 15 Stage
AquaHomeGroup 15 Stage excels for hard water conditions. It utilizes a multi-stage filtration process. The filter combines KDF 55, calcium sulfite, and ceramic balls. You experience significant reductions in limescale and chlorine. Installation is straightforward.
Choose based on your needs. Enjoy improved water quality and a better shower experience with these top filters.
Installation Tips for Shower Filters
Tools and Materials Needed
You’ll need a few basic tools:
- Adjustable wrench for securing connections.
- Plumber’s tape for sealing threads.
- Bucket to catch water during removal.
- Turn Off Water
Ensure the water is off. Turn the shower handle to verify no water flows. - Remove Existing Showerhead
Use the adjustable wrench to loosen and remove the showerhead. Hold the shower arm to avoid damaging it. - Clean Threads
Wipe the shower arm threads with a cloth. Remove any debris or leftover tape. - Apply Plumber’s Tape
Wrap plumber’s tape around the threads. Ensure uniform coverage to prevent leaks. - Install Shower Filter
Hand-tighten the shower filter onto the shower arm. Use the wrench to secure if necessary, but don’t over-tighten. - Attach New Showerhead
Screw the new showerhead onto the filter. Use the wrench gently, ensuring it’s snug. - Turn On Water
Turn the water back on. Check for leaks and test the flow. Tighten connections if any leaks appear.
Conclusion
« Dyson Hair Dryer vs Regular: Which One Truly Transforms Your Hair Game?
Discover Reddit’s Top Picks: Best Garage Shelving Ideas to Transform Your Space »
Choosing the right shower filter can make a world of difference for your skin and hair. By removing harmful contaminants like chlorine, you’ll enjoy softer skin and shinier hair. Remember, installing a shower filter is a straightforward process that requires just a few tools and a bit of time. Whether you’re looking for a basic filter or a high-tech multi-stage system, there’s an option out there to suit your needs. So go ahead and invest in a shower filter—you’ll be amazed at the benefits it brings to your daily routine.


